This blog explains how we can create a self-signed development certificate trusted by Microsoft Edge.
As a bit of background, I’m doing some testing in a local Hyper-V lab to stand up a sample App-V streaming server. Be mindful that these certificates are only used for development purposes and not for a production environment.
Create a Self-Signed Development Certificate Trusted by Microsoft Edge
The first step is to create a root certificate authority (CA). This certificate will sign other certificates we issue in our environment. Open a PowerShell session and run the following, ensuring to replace the export path at the end:
$rootCert = New-SelfSignedCertificate -Type Custom `
-KeyExportPolicy Exportable `
-KeySpec Signature `
-Subject "CN=DevRootCA" `
-KeyAlgorithm RSA `
-KeyLength 2048 `
-HashAlgorithm SHA256 `
-CertStoreLocation "Cert:\CurrentUser\My" `
-NotAfter (Get-Date).AddYears(10) `
-KeyUsage CertSign, CRLSign

# Export the root certificate to a .cer file
Export-Certificate -Cert $rootCert -FilePath C:\Alkane\DevRootCA.cer
We then install this certificate into the Computer Trusted Root Certificate Authority certificate store on every machine. I did this using a computer group policy by importing the certificate C:\Alkane\DevRootCA.cer in the following location: Computer Configuration > Policies > Windows Settings > Security Settings > Public Key Policies > Trusted Root Certificate Authorities. When you generate the certificate it will place it in the Computer personal store. You can simply open certlm.msc and manually move it into the Trusted Root Certificate Authority store before we proceed to the next step.
We can then use the root certificate to issue a certificate for our development web server. Once again, replace the DnsName and Subject to suit your own requirements:
#get root CA
$rootCert = Get-ChildItem -Path Cert:\CurrentUser\My | Where-Object { $_.Subject -eq "CN=DevRootCA" }

#issue new certificate
New-SelfSignedCertificate -Type Custom `
-DnsName "localhost", "::1", "alkaneweb", "alkaneweb.alkanesolutions.co.uk", "192.168.0.100" `
-KeyAlgorithm RSA `
-KeyLength 2048 `
-HashAlgorithm SHA256 `
-Subject "CN=alkanesolutions.co.uk" `
-Signer $rootCert `
-CertStoreLocation "Cert:\LocalMachine\My" `
-NotAfter (Get-Date).AddYears(10)
This certificate is added to our Personal certificate store (Cert:\LocalMachine\My) automatically, which has a trusted chain to the root certificate. And by default this then appears in Internet Information Services (IIS) to bind to our site.
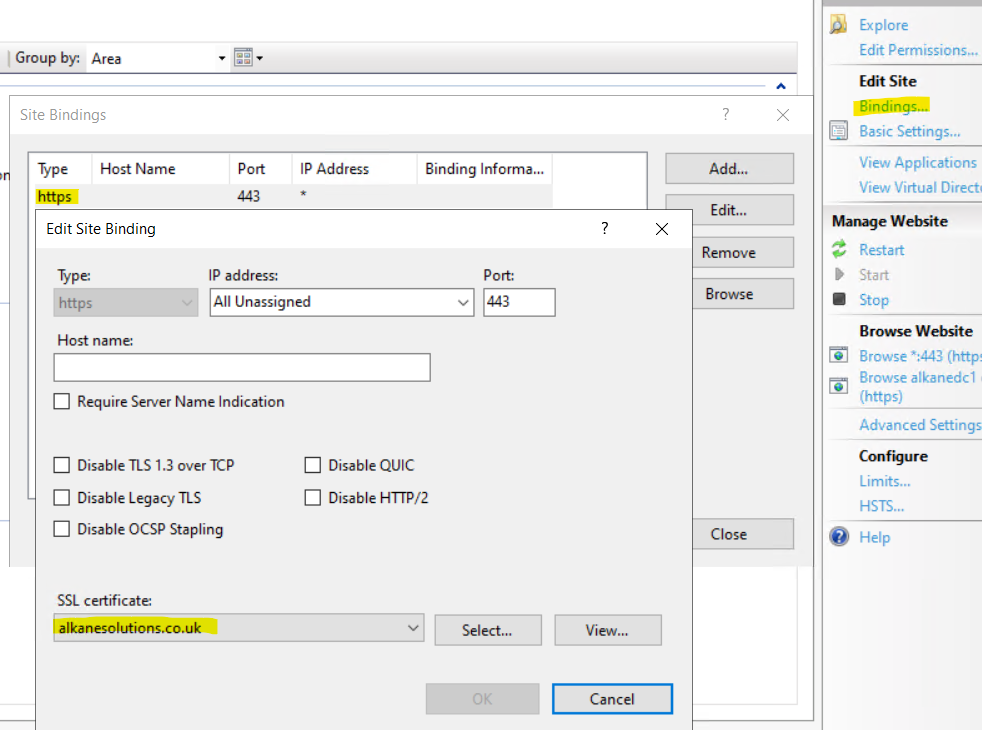
In IIS highlight your site. Over to the right click Bindings. Then Add. Change the Type to https. And under SSL certificate, select the certificate we have just generated.
Finally, I am using Windows Authentication to authenticate with my website. This worked fine over HTTP. But when testing over HTTPS I kept getting an authentication prompt to enter credentials. When I entered the credentials it authenticated fine, but this manual step became annoying. The solution was to add my site to the Intranet Zone for seamless authentication in Microsoft Edge. Again, I did this using a group policy by navigating to Computer Configuration > Policies > Administrative Templates > Windows Components/Internet Explorer/Internet Control Panel/Security Page and adding https://alkaneweb.alkanesolutions.co.uk/ with a zone of 1 (Intranet Zone).


