MSIX Application Packaging Services

You’d be forgiven for being confused when it comes to Microsoft application packaging and installation frameworks.  It’s a constantly evolving landscape of emerging technologies, with various name changes along the way!

This blog provides a brief history of application packaging and installation frameworks, taking us from setup.exe to MSIX application packaging services.

InstallShield Setup.exe

Back in the days of Windows 95, Microsoft endorsed InstallShield as an installation framework for applications.  However these setup.exe installation packages weren’t very intelligent.  They had no real knowledge of other applications that were currently installed and often resulted in conflicts such as DLL hell and, over time, the degradation of the underlying operating system commonly referred to as ‘winrot’.

The total cost of ownership (TCO) for each device was relatively high, since these conflicts frequently required debugging or ultimately desktop rebuilds.

Windows Installer (MSI)

This led to the introduction of Microsoft Installer (MSI – now known as Windows Installer), which provided more resiliency in the form of rollback, self healing, self repair, dynamic link library (DLL) reference counting and much more.

If authored by a competent application packager, MSI provided a highly reliable installation framework and still does.  The big problem was that many application packagers weren’t (and still aren’t) competent.  They don’t understand how each table in the MSI relational database works, or about COM registration, or about the plethora of Custom Actions available, and a host of other things.  The complexity of authoring bullet proof MSI packages is a steep learning curve for most.

Microsoft ClickOnce

Microsoft introduced ClickOnce as part of the .Net 2 framework, aimed at reducing application conflicts by installing self-contained and self-updating applications.  These  deployments enabled non-administrative users to install them and granted only those users code access security (CAS) permissions necessary for the application.  But there were limitations which prevented ClickOnce applications from installing new fonts, installing files to the Global Assembly Cache (GAC) and writing registry changes.

Microsoft App-V 4.x

Microsoft App-V 4, formerly Softricity Softgrid, overcame ClickOnce technological limitations and eliminated conflict issues associated with setup.exe and MSI by providing isolation against other applications and the underlying operating system.  This meant that junk cleaning and conflict checking was no longer as important.  But due to this level of isolation and the new file format (which streamed in blocks rather than files), there were inherent technological limitations such as the inability to natively package device drivers and a package size limitation of 4gb.

Microsoft App-V 5.x

Microsoft then developed App-V 5.  This was a complete rewrite of the App-V 4 technology by doing away with the SFT file system and introducing an NTFS file system and ‘real’ registry.  The package format also adopted principles of the Open Package Specification (OPC), which is essentially a set of standards to store binary data and XML metadata in a single entity leveraging Open XML and ZIP formats.

App-V 5 had (and still has) a very high success rate when packaging Win32 applications (your common desktop applications) and resolved some of the issues associated with App-V 4 such as the 4gb package size limitation.  However once again, due to being a virtualised package format it still inherited some of the same limitations associated App-V 4.6 such as an inability to package kernel-mode device drivers.

Universal Windows Platform (UWP)

Meanwhile user requirements were beginning to change.  Users needed to access applications on mobile devices in a touch-friendly way.  So Microsoft introduced Universal Windows Platform (UWP) applications (formerly ‘Windows Store’ app or ‘Metro’ app) based on the Appx file format (which also adopts principles of the OPC).  These applications are delivered via the Windows Store (which is now called the Microsoft Store).  But alas, the UWP packaging format didn’t place nicely with traditional Win32 applications and developers were reluctant to rewrite their software just to accommodate UWP.

MSIX Application Packaging Services

In 2018 Microsoft announced a new package format called MSIX – an attempt to create a unified packaging format by combining the best features of MSI, Appx (UWP apps), App-V, and ClickOnce.

Unlike UWP, MSIX supports the packaging of Win32 applications as well as WPF and Windows Forms applications.  And similarly to Appx and App-V, the .MSIX file format is also based on the OPC specification (as such the file extension can be renamed to .zip and extracted using your zip compression tool of choice).

As an added layer of security, it is now a requirement to sign every MSIX package with a valid code-signing certificate.  This means that since the applications are trusted they can be installed from the web, from the Microsoft Store, via SCCM or otherwise.

Microsoft also claims that MSIX provides very reliable installations, clean uninstalls, seamless updates, with optimised network bandwidth and disk space usage.  They also promote a simple transition from your existing application packaging format to the new MSIX format.

There are also some nice new features such as exposure to a wealth of APIs to accomplish things like sending push notifications, and the emergence of MSIX app attach which utilises the VHD file format to perform application layering!

However in its current state, and even though App-V 5 is no longer being actively developed,  MSIX is still not ready for enterprise production environments.

There is still no support for device driver installations.  There is no way for multiple separate MSIX packages to interact with each other like we saw previously with dynamic suite composition (DSC) and connection groups (CG).  There is no native support for MSIX shortcuts that pass command line arguments to the executable.  And no doubt there will be a plethora of other bugs on the horizon that require remediation. (Update – we have developed a Free MSIX Packaging Tool to provide “fixups” via the Package Support Framework)

We will keep a close eye on the evolution of MSIX technology.  But in the mean time please get in touch should you have any application packaging enquiries.

Virtualisr – FREE App-V 4.6, App-V 5 and App-V 5.1 Automated Sequencing

Virtualisr is a tool used for App-V 4.6, App-V 5 and App-V 5.1 automated sequencing/virtualisation.  It can convert scripted installs (VBS, BAT, CMD) to App-V, convert MSI to App-V and convert executables/legacy installers to App-V.  It can rapidly accelerate application migrations and save your company hundreds of man-hours and thousands of pounds.  Other virtualisation technologies can be supported upon request.

PLEASE NOTE: There seems to be a bug with the New-AppvSequencerPackage cmdlet in the Windows ADK version of the sequencer.  PSR mode may not work with this version.

PLEASE ALSO NOTE: I generally only use Virtualisr when I have a batch of pre-configured (or default) apps that I need to quickly convert, or if I’m performing a  migration for a client.  In reality this is probably every few months since most of the time I will package ad-hoc requests.  During this period Oracle tend to update VirtualBox and as part of these updates they usually alter the command line syntax!  This may stop Virtualisr from functioning correctly.  If this is the case please contact me and I will attempt to resolve any issues as soon as possible.

Download:

Pricing:

  • FREE!  (for a limited period – licenses will be provided in batches of 10).  License key must be obtained from us first.  Contact us here

Overview:

  • App-V 4.6, App-V 5 and App-V 5.1 Automated Sequencing/VirtualisationOracle VirtualBox
  • Sequence on your own custom virtual machines
  • Keep your installation files local and secure
  • Utilise industry leading Oracle virtualisation software
  • Bulk import multiple applications to convert, and perform batch conversion whilst you make a brew!
  • Perform batch automated* conversions of .EXE (legacy installers), .MSI, .VBS, .BAT and .CMD to App-V 4.6 and App-V 5 formats
  • Supply command-line arguments for your installation target
  • Apply one or many transforms (MSTs) to MSI installations
  • Manually specify package names (auto-generated from imported MSI/MST name as default)
  • Perform MNT/VFS installations (App-V 4.6)
  • Manually specify PVAD, or automatically set PVAD to actual installation directory (App-V 5/MSI only)
  • Specify App-V templates, Full Load, Mount Drives etc
  • Record Problem Step Recorder screenshots to use as part of your discovery inventory
  • Output conversions to a logical folder structure
  • Compatible with Oracle VirtualBox and VMWare Workstation** virtual machines
  • License not used for failed conversions***
  • Unlimited remote support

* scripted installations can only be automatically converted if the scripts themselves are automated with no human interaction required.

** VMWare Virtual Machine needs to be hosted inside Oracle VirtualBox

*** sufficient error handling required in scripts

Missing any functionality?  Contact us here to request it.

virtualisr

Why Virtualisr:

There are products such as Autonoware ConversionBox and Flexera AdminStudio Virtualization Pack which already provide automated App-V virtualisation and do a decent job of it.  However these are costly (certainly when we’re talking about multiple application portfolios containing several hundred applications), cumbersome installations with often complex licensing agreements.  Virtualisr is a lightweight (under 500kb) executable used alongside Oracle VirtualBox and is completely free.

System Requirements:

  • 6GB Memory (minimum)
  • 2.5 GHz dual-core Intel or AMD processor
  • Powershell 2
  • Microsoft .Net 3.5
  • Oracle VirtualBox (https://www.virtualbox.org/wiki/Downloads)

Setup:

The Virtualisr executable does not install anything.  The program is run directly.  It works by launching virtual machines that are hosted in Oracle VirtualBox (since VirtualBox is free).  You can also mount your VMWare virtual machines in VirtualBox in order to use Virtualisr.

Step 1 – Install Oracle VirtualBox

You can download it from this location: https://www.virtualbox.org/wiki/Downloads

Step 2 – Create your Sequencing Virtual Machine base image

NOTE: If you already have VMWare virtual machines set up you can use these by importing them into Oracle VirtualBox (Just select ‘Use an existing virtual hard drive file’ and then specify the VMDK/VDI when asked to configure the hard drive).  If you already have VirtualBox virtual machines configured you can use those too.  In both cases, just ensure you have the latest Guest Additions (see below) and you can then ignore this step and step 3.

Get hold of an ISO of the Windows operating system that you want to sequence applications on.  Open Oracle VirtualBox.  Create a new Virtual Machine, specifying memory amount and hard disk configurations. Be wary that there are some large applications out there. I’ve created mine as the default 25GB.

Once you’ve created it, start the VM and point to your Windows ISO when it prompts to select a start-up disk. Follow the usual instructions to install your copy of Windows. Ensure that you give the admin account a password and don’t just leave it blank.

Once this is complete and you’re logged in to the operating system, install the latest Guest Additions (I installed 4.3.12 at the time of writing this).  You can obtain it from this location:

VirtualBox Guest Additions (choose version and downoad the .iso, for example VBoxGuestAdditions_4.3.8.iso)

and instructions are here:

https://www.virtualbox.org/manual/ch04.html#additions-windows

Reboot your VM. Configure the base image as required (service packs, windows updates etc).  Once done, disable Windows Updates, stop the Windows Defender and Windows Search services.  Disable Action Center messages. And disable User Account Control.

Create a snapshot.  I called mine ‘base’

Step 3 – Create your App-V 4.6 and App-V 5.0 snapshots

With our base snapshot running, install the App-V 4.6 sequencer with all the relevant service pack and hotfixes. Once done, create a snapshot called ‘App-V 4.6 <Service Pack/Hotfix etc>’.  For example, mine is called ‘App-V 4.6 SP3’.

Now revert back to the base snapshot. Install the App-V 5 sequencer, again with any service packs and hotfixes. You may also need to install the relevant prerequisites for the App-V 5 Sequencer. Once done create another snapshot.  I called mine ‘App-V 5.0 SP2 HF5’.

You should now be ready to sequence!  It’s pretty self explanatory (i think!), but just in case it’s not, here are a few instructions:

How it Works:

Before you start, create a folder and dump all of your installation source in there.  I created a folder on the root of C: called ‘ToConvert’.  I also organised each application into their own folder for clarity.

Step 1 – Launch Virtualisr.exe

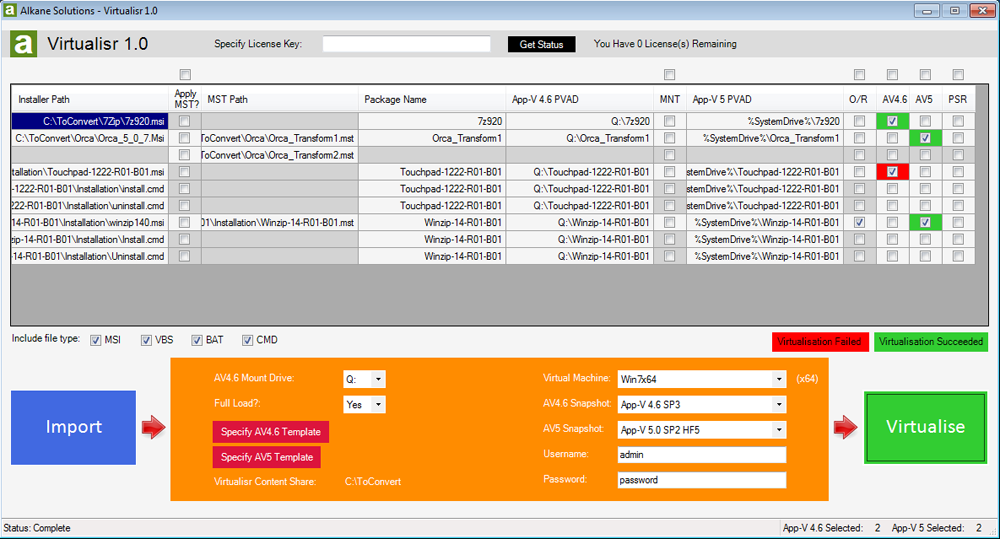
Step 2 – Import Packages to Virtualise

Specify your license key.  You can check how many licenses you have available by clicking ‘Get Status’.

Click ‘Import Source Files’ and point to your source dump location.  In my case, as mentioned above, my source dump is C:\ToConvert.  Click Ok and all of the .MSI, .MST, .CMD, .BAT and .VBS files will populate in the DataGrid.  You can filter which file type you want to view.  From the screenshot above, you can see there are 11 columns.  They should all be self explanatory but you can hover over the header for more information.

  • Dark grey denotes a disabled cell
  • Select zero to many transforms.  If you need them to apply in a specific order I suggest you name them alphabetically (or prefix with a number) to order them as they will install in the order shown in the GUI
  • The Package Name column is editable.  By default it will give this the name of the MSI/First MST/Script provided as install source.
  • The PVAD columns are also editable
  • The MNT checkbox will (in the case of and MSI) attempt to install the MSI to the PVAD location.  Otherwise it will perform a VFS installation.
  • The O/R (Override) checkbox will attempt to get the INSTALLDIR of an MSI and set the App-V 5 PVAD to this location
  • Select the ‘AV4.6’ or ‘AV5’ check box to convert the installer to the relevant format
  • Configure Feature Block 1 with FullLoad
  • Specify the Virtual Machine to use, and select the appropriate snapshots for sequencing App-V 4.6 and App-V 5 packages.  You must also specify the login credentials for the admin user.

Step 3 – Click Virtualise!

Output:

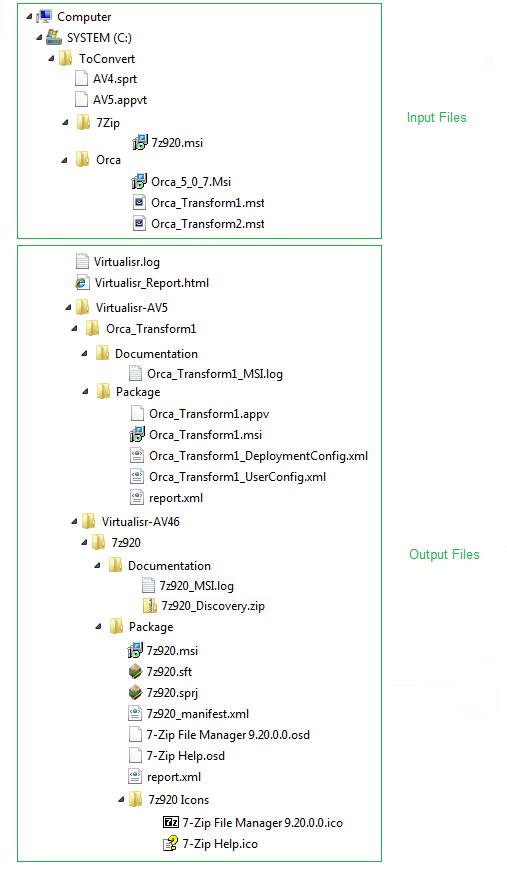
Two folders will be created in your source dump folder called ‘Virtualisr-AV5’ and ‘Virtualisr-AV46’.  Your packages will be output to these locations, and named according to the package name you specified in the DataGrid.

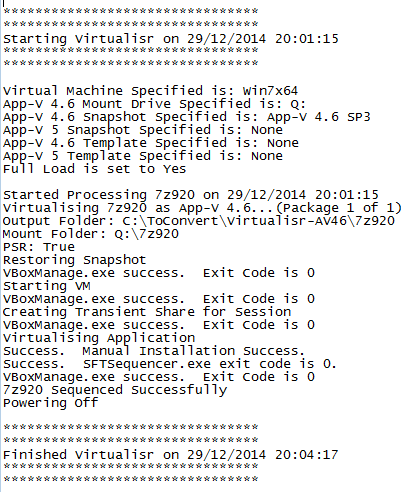
A log file will also be created in the source dump folder called virtualisr.log.  This is appended to each time you run Virtualisr, and is opened at the end of each session.  It should contain installer exit codes (in case the installer fails), sequencer exit codes (in case the sequencer fails) and VBoxManage.exe exit codes (in case the VirtualBox element fails).

Virtualisr log

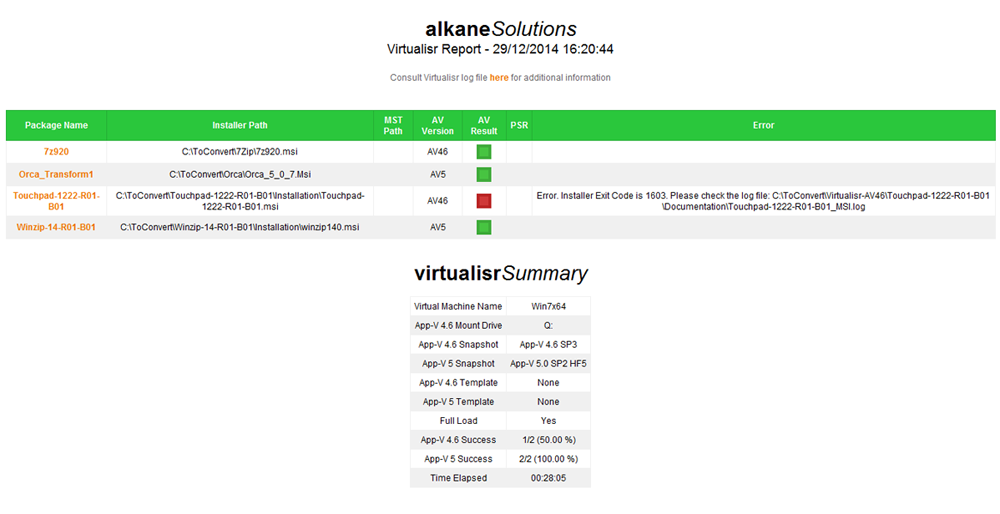
A HTML report will be generated called Virtualisr_Report.html.  This will contain information from the sequencing session such as success rate, time elapsed, configurations, and package success etc.  Remember that ‘green’ means it has been successfully virtualised, but this does not imply that it will work in the App-V technology.  You will need to use a compatibility toolset to find this out before passing the application through Virtualisr.

Virtualisr report

Under the hood:

When the conversion process starts, a shared folder is created on the guest virtual machine and is mapped to the source dump folder on the host (in our example this is C:\ToConvert).  This is the only location on the host that the VirtualBox session has access to.  Hence any installation source, App-V templates, log files, reports and App-V output is located here.  See the screenshot below for an example of the files required for input, and the files which are output:

Virtualisr Input Output

Finally…:

I’m aware that once you kick off the conversion process that the GUI becomes unresponsive.  However the status in the bottom left will update, the log file will update and also the datagrid cells will be highlighted red (failure)/green (success) after each application has been processed.

Multi-threading in Powershell is not trivial, and one day I may look into using the Start-Job cmdlet and timers, as referenced to here: http://www.sapien.com/blog/2012/05/16/powershell-studio-creating-responsive-forms/.  But until that day, click ‘Virtualise’ and go and make yourself a brew (or a few brews, depending upon how many apps you choose to virtualise).