What is an MSIX AppxManifest.xml

When looking at the anatomy of an MSIX package, one of the most important files is AppxManifest.xml. But what is an MSIX AppxManifest.xml file, and what is it used for?

The MSIX app manifest is an XML file that provides important information about the MSIX application, such as its name, version, dependencies, and capabilities. Here is a breakdown of the different elements that make up an MSIX app manifest:

  1. Package Identity: This section contains information about the package identity, such as the package name, publisher, and version.
  2. Dependencies: This section lists any dependencies that the application has, such as other packages or libraries that need to be installed alongside the main application package.
  3. Capabilities: This section specifies the capabilities that the application requires, such as access to certain system resources or features. This helps to ensure that the application is only installed on systems that meet the necessary requirements.
  4. Executables: This section lists the executable files that are included in the package, along with their associated entry points.
  5. File Associations: This section specifies any file associations that the application should register with the operating system.
  6. Registry: This section provides information about any registry keys that the application needs to create or modify.
  7. Environment Variables: This section lists any environment variables that the application needs to set.
  8. Extensions: This section specifies any extensions that the application needs to install, such as browser extensions or shell extensions.
  9. Visual Elements: This section provides information about the application’s visual elements, such as the icon and splash screen.
  10. Applicability: This section specifies any rules or conditions for when the application can or cannot be installed, such as minimum system requirements or compatibility with specific versions of Windows.

Overall, the MSIX app manifest is a key component of the MSIX package, providing important information about the application that helps to ensure its proper installation and operation on the target system.

AppxManifest.XML Example Content

Here’s an example of an AppxManifest.xml file for a simple MSIX app:

<?xml version="1.0" encoding="utf-8"?>
<Package xmlns="http://schemas.microsoft.com/appx/manifest/foundation/windows10"
xmlns:mp="http://schemas.microsoft.com/appx/2014/phone/manifest"
xmlns:uap="http://schemas.microsoft.com/appx/manifest/uap/windows10"
IgnorableNamespaces="uap mp">
<Identity Name="Contoso.MyApp" Publisher="CN=01234567-89ab-cdef-0123-456789abcdef" Version="1.0.0.0" />
<Properties>
<DisplayName>My App</DisplayName>
<PublisherDisplayName>Contoso, Inc.</PublisherDisplayName>
<Description>A simple app for Windows</Description>
<Logo>Assets\Logo.png</Logo>
</Properties>
<Dependencies>
<TargetDeviceFamily Name="Windows.Desktop" MinVersion="10.0.14316.0" MaxVersionTested="10.0.19042.0" />
</Dependencies>
<Resources>
<Resource Language="en-us" />
</Resources>
<Applications>
<Application Id="App" Executable="MyApp.exe" EntryPoint="Windows.FullTrustApplication">
<uap:VisualElements DisplayName="My App" Description="A simple app for Windows" Square150x150Logo="Assets\Square150x150Logo.png" Square44x44Logo="Assets\Square44x44Logo.png" />
</Application>
</Applications>
</Package>

This AppxManifest.xml file contains the following elements:

  • The Identity element specifies the name, publisher, and version of the app.
  • The Properties element specifies the display name, publisher display name, description, and logo of the app.
  • The Dependencies element specifies the target device family and minimum and maximum versions of Windows that the app supports.
  • The Resources element specifies the language of the app.
  • The Applications element specifies the app’s executable file, entry point, and visual elements such as its display name and logos.

Configuring RunVirtual Registry from the AppxManifest.xml

To configure the RunVirtual key from an App-V package we needed to add a registry key/value to the local machine via an App-V script. Since our environment is VDI we are using a new feature in App-V 5 SP3 which enables us to target an App-V application which is published to the user (and not to the machine).

I won’t discuss what RunVirtual is – you can read this if you need to know.

The key reason for this tutorial is because we are performing this logic in the AppxManifest.xml and NOT the UserConfig.xml. I prefer to add my logic to AppxManifest.xml since it makes my package self-contained with no reliance on external (xml) files – see here.

Why is adding RunVirtual registry logic to the AppxManifest.xml different from adding it to the UserConfig.xml?

Well first a very brief bit of background – the registry key/value we need to add is:

HKCU\SOFTWARE\Microsoft\AppV\Client\RunVirtual\{LocalProcess.exe}

(Default) REG_SZ {PackageId}_{VersionId}

By creating a key under RunVirtual with the process name (Excel.exe in this case) we effectively saying “whenever we run Excel.exe I want it to run in the same virtual space as the App-V package with the specified PackageId_VersionId”. As you’ve probably gathered, this specific package was an Addin for Microsoft Excel.

Adding the logic via a UserConfig.xml script is relatively trivial. We can open the XML file in a text editor and add the following:

   <UserScripts>
<PublishPackage>
<Path>cmd.exe</Path>
<Arguments>/C REG ADD HKCU\SOFTWARE\Microsoft\AppV\Client\RunVirtual\Excel.exe /ve /d "2a04d2aa-ad7a-4c51-b774-00ca0e1e1fad_e2ce036d-9cbf-479d-9b67-8b4648742e8c" /f</Arguments>
<Wait RollbackOnError="true" Timeout="30"/>
</PublishPackage>
<UnpublishPackage>
<Path>cmd.exe</Path>
<Arguments>/C REG DELETE HKCU\SOFTWARE\Microsoft\AppV\Client\RunVirtual\Excel.exe /f</Arguments>
<Wait RollbackOnError="false" Timeout="30"/>
</UnpublishPackage>
</UserScripts>

However adding a similar change via the AppxManifest.xml is slightly more complex. Whenever we import a new AppxManifest.xml via the Advanced tab in Edit mode, we need to save the package afterwards for the change to take effect. And what does this do? It flips the VersionId of the package! So we’re left with a situation whereby whenever we update the VersionId in the AppxManifest.xml it becomes redundant as soon as we save the updated package!

Introducing the Powershell approach….

Ignore the slightly different XML syntax for now – this is irrelevant in the context of this tutorial.

<appv:UserScripts>
<appv:PublishPackage>
<appv:Path>powershell.exe</appv:Path>
<appv:Arguments>-ExecutionPolicy ByPass -command "Get-AppvClientPackage -all | where {$_.Name -eq 'Alkane_Package'} | foreach { New-Item -Path HKCU:\SOFTWARE\Microsoft\AppV\Client\RunVirtual -Name Excel.exe -Value ($_.PackageId.toString() + '_' + $_.VersionId.toString()) -Force }"</appv:Arguments>
<appv:Wait RollbackOnError="false" />
</appv:PublishPackage>
<appv:UnpublishPackage>
<appv:Path>powershell.exe</appv:Path>
<appv:Arguments>-ExecutionPolicy ByPass -command "Remove-Item -Path HKCU:\SOFTWARE\Microsoft\AppV\Client\RunVirtual\Excel.exe -Recurse -Force"</appv:Arguments>
<appv:Wait RollbackOnError="false" />
</appv:UnpublishPackage>
</appv:UserScripts>

The main part to note is the Powershell one-liner, which I’ll explain below:

Get-AppvClientPackage -all | where {$_.Name -eq 'Alkane_Package'} | foreach { New-Item -Path HKCU:\SOFTWARE\Microsoft\AppV\Client\RunVirtual -Name Excel.exe -Value ($_.PackageId.toString() + '_' + $_.VersionId.toString()) -Force }

What we’re doing here is:

  • Getting all locally ADDED packages (Note that Get-AppvClientPackage -Name “Alkane_Package” will return nothing since the package is not published when the PublishPackage event runs!)
  • Looping through them where the Name attribute is the name of my target package (Alkane_Package)
  • We then use foreach because of this
  • And then we can dynamically get the PackageId and VersionId of the package to add it to the registry value

Scripting Examples for App-V 5 (Updated)

Below are a few scripting examples for App-V 5 configuration files (DeploymentConfig, UserConfig and AppxManifest files – the XML syntax varies slightly between these files but the same principle applies). They’re purely for illustrative purposes and aim to show how we can string together the executable and their arguments to achieve different things.

**UPDATED WORKAROUND FOR MSIEXEC – Scroll down…**

**ANOTHER UPDATED WORKAROUND FOR MSIEXEC – Scroll (further) down…**

Installing a shim

<MachineScripts>              
<AddPackage>        
<Path>sdbinst.exe</Path>        
<Arguments>/q "[{AppVPackageRoot}]\..\Scripts\ExampleFile.sdb"</Arguments>      
<Wait RollbackOnError="true" Timeout="30"/>      
</AddPackage>   
</MachineScripts>

Running a Powershell script

<MachineScripts>
<AddPackage>
<Path>powershell.exe</Path>
<Arguments>-ExecutionPolicy ByPass -WindowStyle Hidden -File "[{AppVPackageRoot}]\..\Scripts\ExampleFile.ps1"</Arguments>
<Wait RollbackOnError="true" Timeout="30"/>
</AddPackage>
</MachineScripts>

Running a Powershell command (machine)

<MachineScripts>
<AddPackage>
<Path>powershell.exe</Path>
<Arguments>-ExecutionPolicy ByPass -WindowStyle Hidden -Command  "&amp; { Get-EventLog -LogName security }"</Arguments>
<Wait RollbackOnError="true" Timeout="30"/>
</AddPackage>
</MachineScripts>

Running a Powershell command (user DPI setting via Powershell registry)

<UserScripts>      
<PublishPackage>
<Path>powershell.exe</Path>
<Arguments>-ExecutionPolicy ByPass -WindowStyle Hidden -Command  "&amp; { If (-Not(Test-Path 'HKCU:\SOFTWARE\Microsoft\Windows NT\CurrentVersion\AppCompatFlags\Layers')) { New-Item -Path 'HKCU:\SOFTWARE\Microsoft\Windows NT\CurrentVersion\AppCompatFlags\Layers' -Force; } New-ItemProperty -Path 'HKCU:\SOFTWARE\Microsoft\Windows NT\CurrentVersion\AppCompatFlags\Layers' -Name '[{ProgramFilesX86}]\Alkane\Alkane.exe' -PropertyType String -Value '~ DPIUNAWARE' -Force }"</Arguments>
<Wait RollbackOnError="false" Timeout="30"/>
</PublishPackage>   
</UserScripts>

Running an EXE (For example, Powershell) without waiting for execution to complete

<MachineScripts>
<AddPackage>
<Path>cmd.exe</Path>
<Arguments>/c START "" "powershell.exe" -ExecutionPolicy ByPass -WindowStyle Hidden -File "[{AppVPackageRoot}]\..\Scripts\runProcess.ps1"</Arguments>
<Wait RollbackOnError="true" Timeout="30"/>
</AddPackage>
</MachineScripts>

Running a VBScript (via the CScript engine)

<MachineScripts>
<AddPackage>
<Path>cscript.exe</Path>
<Arguments>"[{AppVPackageRoot}]\..\Scripts\ExampleFile.vbs"</Arguments>
<Wait RollbackOnError="true" Timeout="30"/>
</AddPackage>
</MachineScripts>

Running a VBScript (via the WScript engine)

<MachineScripts>
<AddPackage>
<Path>wscript.exe</Path>
<Arguments>"[{AppVPackageRoot}]\..\Scripts\ExampleFile.vbs"</Arguments>
<Wait RollbackOnError="true" Timeout="30"/>
</AddPackage>
</MachineScripts>

Installing an MSI (if this doesn’t work see workarounds below!)

<MachineScripts>
<AddPackage>
<Path>msiexec.exe</Path>
<Arguments>/i "[{AppVPackageRoot}]\..\Scripts\ExampleFile.msi" /qb</Arguments>
<Wait RollbackOnError="true" Timeout="30"/>
</AddPackage>
</MachineScripts>

Installing a Driver

<MachineScripts>
<AddPackage>
<Path>pnputil.exe</Path>
<Arguments>/i /a "[{AppVPackageRoot}]\..\Scripts\ExampleFile.inf"</Arguments>
<Wait RollbackOnError="true" Timeout="30"/>
</AddPackage>
</MachineScripts>

Adding a Registry String Value

<MachineScripts>
<AddPackage>
<Path>reg.exe</Path>
<Arguments>ADD HKLM\SOFTWARE\AlkaneTestKey /f /v AlkaneTestValue /t REG_SZ /d AlkaneTestData</Arguments>
<Wait RollbackOnError="true" Timeout="30"/>
</AddPackage>
</MachineScripts>

Giving Modify Permission to a Directory

<MachineScripts>
<AddPackage>
<Path>icacls.exe</Path>
<Arguments>"C:\AlkaneTest" /grant Users:(OI)(CI)(M) /C /Q</Arguments>
<Wait RollbackOnError="true" Timeout="30"/>
</AddPackage>
</MachineScripts>

Creating a Symbolic Link (Running a windows command shell internal command – see here)

<MachineScripts>
<AddPackage>
<Path>cmd.exe</Path>
<Arguments>/C MKlink /D C:\AlkaneSolutions "C:\Program Files\AlkaneSolutions"</Arguments>
<Wait RollbackOnError="true" Timeout="30"/>
</AddPackage>
</MachineScripts>


**UPDATED WORKAROUND FOR MSIEXEC**

I referred a colleague of mine to this blog today. He was trying to install an MSI from within the Scripts folder of his App-V 5 package. But the example above didn’t work for him!!? Event Viewer stated that MSIEXEC could not locate the MSI!? I ran Process Monitor to confirm this. And then I ran a quick local test.

I created two folders in the root of the C drive – C:\Scripts and C:\Root. As you can probably tell, I was recreating the folder structure of an App-V 5 package to try and recreate the issue.

Essentially when we construct a path in an App-V 5 scripting node such as:

“[{AppVPackageRoot}]\..\Scripts\ExampleFile.msi”

When the package is added to a machine it will resolve to something like:

“C:\ProgramData\App-V\{PackageGUID}\{VersionGUID}\Root\..\Scripts\ExampleFile.msi”

Note how the path starts in the “Root” folder (“[{AppVPackageRoot}]”), goes up a level (“\..\”) and then goes into the Scripts folder.

To replicate this behaviour I placed a sample MSI in C:\Scripts called ExampleFile.msi and then opened up a command prompt and ran:

notepad.exe "c:\Root\..\Scripts\ExampleFile.msi"

The MSI opened in Notepad with no issues (full of gobbledygook as expected). I then ran:

msiexec.exe "c:\Root\..\Scripts\ExampleFile.msi"

Ooops! The exact same path could not be resolved by the MSIEXEC engine! So I assume MSIEXEC cannot handle the double-dot notation to go up one level in the directory structure? As a workaround we had to run the MSI with a slightly different approach:

<MachineScripts>
<AddPackage>
<Path>cmd.exe</Path>
<Arguments>/c cd "[{AppVPackageRoot}]\..\Scripts" &amp; msiexec.exe /i "Example.msi" /qn</Arguments>
<Wait RollbackOnError="false" Timeout="30"/>
</AddPackage>
<RemovePackage>
<Path>cmd.exe</Path>
<Arguments>/c cd "[{AppVPackageRoot}]\..\Scripts" &amp; msiexec.exe /x "Example.msi" /qn</Arguments>
<Wait RollbackOnError="false" Timeout="30"/>
</RemovePackage>
</MachineScripts>

As ever, make a note of the timeout period (in seconds) if your MSI is likely to take longer to (un)install! Also it might be worth setting RollbackOnError to “false” if your MSI is likely to request a (soft) reboot and return a 3010 (non-zero) error code!

ANOTHER UPDATED WORKAROUND FOR MSIEXEC

A few months later, a new client, a new environment and the the workaround above has seemingly stopped working! For some reason when I checked the process monitor logs it wasn’t parsing the arguments correctly (it was passing the scripts folder path to MSIEXEC?). Anyway. I’ve devised another solution using PowerShell that appears to work well, so here it is:

<AddPackage>
<Path>powershell.exe</Path>
<Arguments>-executionpolicy bypass -command "Start-Process msiexec.exe -ArgumentList @('/i',('\"{0}\Alkane.msi\"' -f (Get-Location).path),'/qn') -Wait"</Arguments>
<Wait RollbackOnError="false" Timeout="30"/>
</AddPackage>
<RemovePackage>
<Path>powershell.exe</Path>
<Arguments>-executionpolicy bypass -command "Start-Process msiexec.exe -ArgumentList @('/x',('\"{0}\Alkane.msi\"' -f (Get-Location).path),'/qn') -Wait"</Arguments>
<Wait RollbackOnError="false" Timeout="30"/>
</RemovePackage>


AppxManifest.xml in place of DeploymentConfig.xml and UserConfig.xml

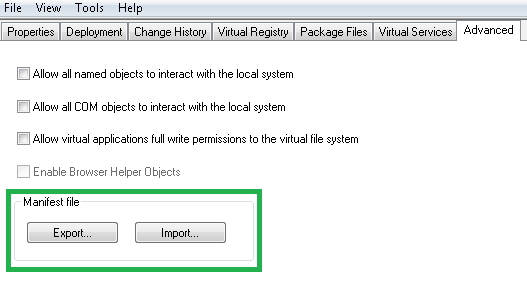
There’s a new feature in the App-V 5.1 Sequencer which enables us to export and import a file called AppxManifest.xml:

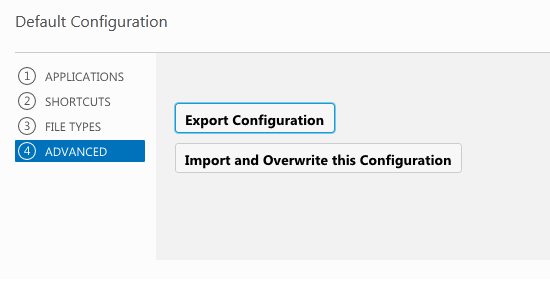
App-V 5.1 Sequencer Import/Export Manifest I’ve been using this approach recently to add custom scripting logic to my packages (I used ACE to make my life slightly easier). What it means is that I can import my App-V package straight into the App-V Management Server and it works straight away with my custom changes – that is, I do not have to manually specify any Deployment/User config files using the approach below:

Appv-5 Overwrite Config It also means that when I’m testing my application in standalone mode I do not have to specify DynamicUserConfigurationPath or DynamicDeploymentConfigurationPath parameters to apply the configurations to my package on the Powershell command line.