I was working on a package recently called Mead Co ScriptX 7.0.2, and was trying to make it work on Windows 7 x64. By default when you clicked the shortcut on the Start Menu it did nothing. However if I ran it in XPSP3 Compatibility Mode it launched. So I decided to create a compatibility shim. This post describes using shims with App-V 5:
Step 1 – Install the Windows Assessment Deployment Kit (ADK):
In this instance we’ll install the ADK on our vitual machine (VM).
Go to the Windows Assessment Deployment Kit (ADK) web page – http://www.microsoft.com/en-us/download/details.aspx?id=30652
Click ‘Download’. The download should commence – run adksetup.exe. You only need to select the Application Compatibility Toolkit (ACT) feature.
Step 2 – Install the application with the executable you want to shim onto the VM.
In our case, we’ll install Mead Co ScriptX 7.0.2.
Step 3 – Launch the Compatibility Administrator:
From the Start Menu run the Compatibilty Administrator. If the .exe you want to shim is 32-bit, run the 32-bit version of the Compatibility Administrator. If the .exe you want to shim is 64-bit, run the 64-bit version of the Compatibility Administrator.
Step 4 – Create the Shim:
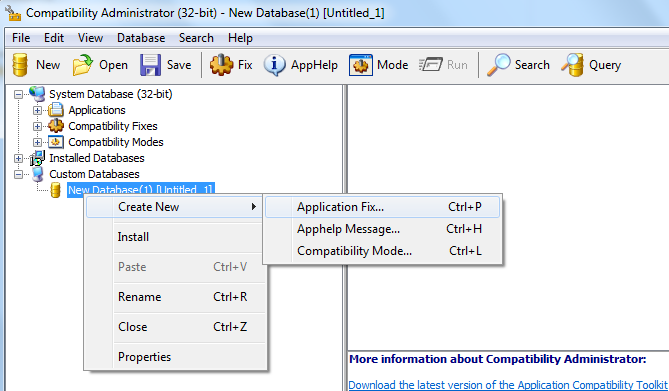
Right-click where it says ‘New Database(1) [Untitled 1]’, Click ‘Create New’ and ‘Application Fix’.
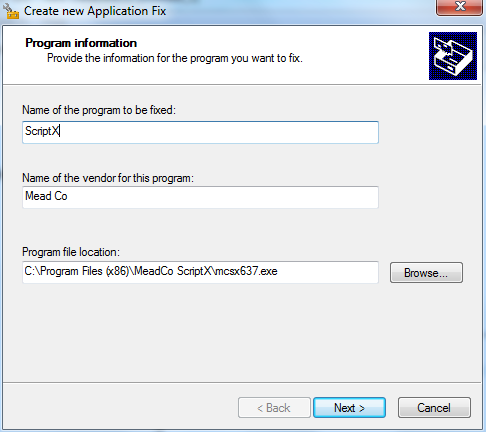
Fill in the Name and Vendor for your shim appropriately. Then navigate to the exe you want to shim. Click Next.
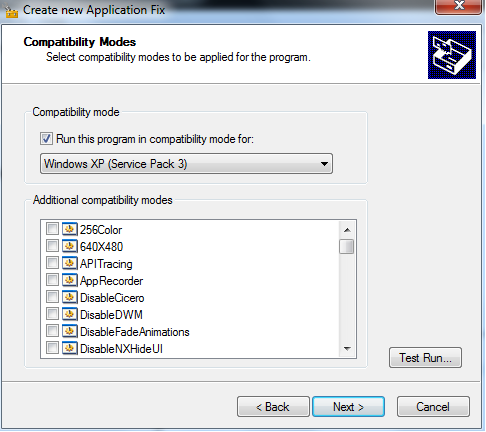
Select the checkbox to run the executable in compatibility mode, and select ‘Windows XP (Service Pack 3)’ from the dropdown list. Click Next.
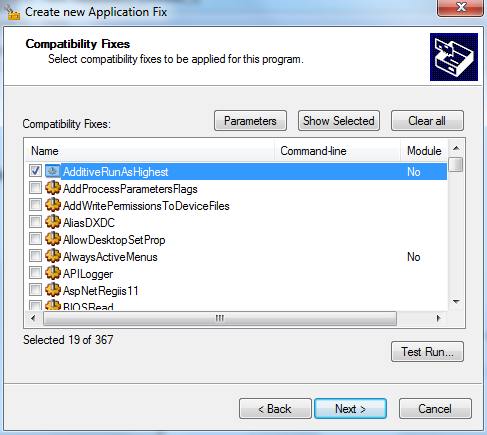
You will notice that because you selected the XPSP3 compatibility option, that 19 of the 367 fixes are automatically applied. Click Next.
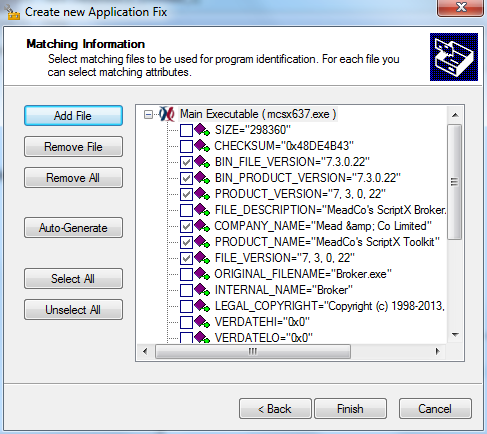
Finally we need to select the matchin file attributes. Thi should be automatically populated from the executable you selected earlier, so just click Finish.
Now click ‘Save’. Give the database a name, and then save it. For example, I called mine MeadCo_ScriptX_703_XPSP3.sdb.
Step 5 – Add the Shim to the App-V 5 package
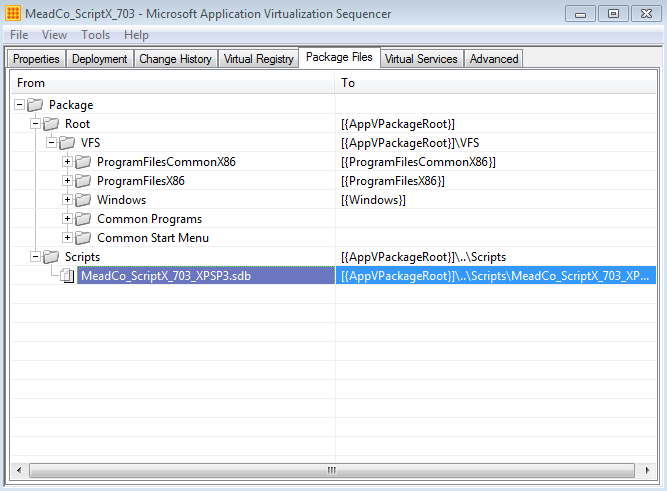
Open your package in the App-V 5 sequencer. Go to the ‘Package Files’ tab. Right-click the ‘Scripts’ folder (it’s on the same level as the ‘Root’ folder) and add your shim file. Save the package.
Step 6 – Update _DeploymentConfig.xml with a script to install and remove the shim
Amend the package _DeploymentConfig.xml file to install (on AddPackage) and remove (on RemovePackage) the shim using the following commands:
<MachineScripts>
    <AddPackage>
        <Path>sdbinst.exe</Path>
        <Arguments>/q "[{AppVPackageRoot}]\..\Scripts\MeadCo_ScriptX_703_XPSP3.sdb"</Arguments>
        <Wait RollbackOnError="true" Timeout="30"/>
    </AddPackage>
    <RemovePackage>
        <Path>sdbinst.exe</Path>
        <Arguments>/q /u "[{AppVPackageRoot}]\..\Scripts\MeadCo_ScriptX_703_XPSP3.sdb"</Arguments>
        <Wait RollbackOnError="false" Timeout="60"/>
    </RemovePackage>
</MachineScripts>
Done! Add/Publish your package, ensuring that you specify the DynamicDeploymentConfiguration parameter:
Add-AppVClientPackage –Path MeadCo_ScriptX_703.appv -DynamicDeploymentConfiguration MeadCo_ScriptX_703_DeploymentConfig.xml | Publish-AppVClientPackage
To check that your shim is installed you should be able to see it in Programs and Features (and your app should launch!)
A few points to remember:
Be careful if you re-save your sequenced package, since it will overwrite your customized DeploymentConfig.xml file!
Also when you test your package, remember to ensure that scripting is enabled using the following command:
Set-AppVClientConfiguration –EnablePackageScripts 1


Nothing works. This simply doesn’t work. You know the only thing that does work? This is pretty f’n kludgy but luckily this is a provisioning server image so I only have to do it to one computer. I have to publish it to the users that need the app, log in as one of those users, right click the application icon, go to the root folder where it’s installed via app-v, then copy that path, go to the command prompt, then type
sdbinst c:\long\ass\path\name\35309520942094\executablename.exe
Then it sets compatibility for the pvs image for anyone who gets that app over app-v.
This is really sad. I’m sorry but Microsoft needs to add this crap to the sequencer app and make this work without all this ridiculous nonsense that doesn’t work.
Hi Nathan. This approach is tried and tested. Did you definately enable scripting on the client machine? Have you ensured the <MachineScripts> tag isn’t still commented out, as it is by default with the supplied template? How did it error? Thanks.
I followed the exact steps you mentioned above, but does not work for App-V Package.
I am using a PowerShell, and confirmed that scripting is enabled, and it does install the Shim on Machine, but upon executing the program it still prompts for UAC.
Any other suggestions?
Thanks in advance.
Hi Rajiv. Sorry for the delay. I guess firstly, does your app work natively in XP SP3 compat mode (just to ensure you’ve created the right type of shim)? And also, ensure your shim points to the correct location for the executable (easiest way is to create your shim on the target platform, to avoid missing ‘(x86)’ and ‘SysWow64’ entries on x64 platforms). Did you ever sort this issue out in the time it’s taken me to reply? 🙂
Also, Rajiv, remember my shim is to run in XPSP3 compat mode. Not to avoid UAC prompts. You may need to create a RunAsInvoker/ForceAdminAccess shim instead. See here for a nice example: http://spablog.ontrex.ch/2013/04/23/shims-and-app-v-5-0/